Using the MVVM pattern on web applications – Part II
Last time we looked at what the MVVM pattern was, and how it is used today in XAML-based applications. Today we are going to take a step further and build a mechanism to use the MVVM pattern on traditional web applications. Imagine how powerful it would be if your UI could evolve independently. We are going to build a simple web application that will display top 5 “memory intensive” processes on the server side, and here’s our basic architecture: 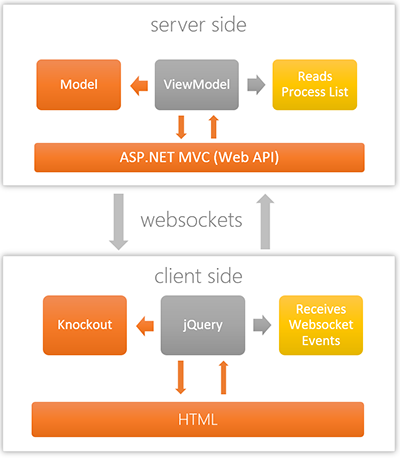
Recall, with MVVM we need the ability for our ViewModels to somehow send messages to the UI. In XAML that happened through Binding events. However, with web application the client and service are completely out-of-process so we need another mechanism to communicate. We use websocket to send messages to the client on the same transport that initiated the connection to the service in the first place. There are few subtleties, but let’s get started we have a somewhat long road ahead, and we will talk about them along the way. Let’s start with the most basic step, the model of our data.
public class ProcessMetadata
{
    public string Name { get; set; }

    public string Memory { get; set; }

    public ProcessMetadata(string name, string memory)
    {
        this.Name = name;
        this.Memory = memory;
    }
}
Nothing special there - all we care about is the name of the process, and the memory it’s currently consuming. Now, that we have the model we want to build our ViewModel (the core logic).
public class TaskViewModel : BaseViewModel
{
    private Timer timer;
    private int counter;
    private Process[] runningProcesses;

    // a list of models (remember in MVVM the ViewModel "knows" about the Model)
    private IList<ProcessMetadata> taskList;
    public IList<ProcessMetadata> TaskList
    {
        get
        {
            return taskList;
        }
        set
        {
            RaiseAndSetProperty<IList<ProcessMetadata>>(ref taskList, value);
        }
    }

    public TaskViewModel()
    {
        taskList = new List<ProcessMetadata>();
        timer = new Timer(updateTasks, null, 2000, 1000);
    }

    private void updateTasks(Object state)
    {
        runningProcesses = Process.GetProcesses();
        TaskList = runningProcesses.
            OrderByDescending(p => p.WorkingSet64).
            ThenBy(p => p.ProcessName).
            Select(p => new ProcessMetadata(
                        p.ProcessName, String.Format("{0:n0} KB", (p.WorkingSet64/1024)))).
            Take(5).
            ToList();

        if (++counter >= 10)
        {
            timer.Change(Timeout.Infinite, Timeout.Infinite);
            timer.Dispose();
        }
    }
}
The first thing to notice here with the ViewModel here is that there is nothing about the UI. We are dealing with normal variables, not UI elements. So what we are doing here is creating a timer, that runs every 2 seconds, and updates the TaskList property. That’s it. In the setter of the TaskList we call a RaisePropertyChanged method. If you recall in Part I, we discussed the INotifyPropertyChanged interface - the standard approach to raising the PropertyChanged event is to implement a RaisePropertyChange method. And that’s exactly what we have here. Nothing different from what you would do in a traditional XAML application. But the secret sauce is what the RaisePropertyChanged method does in this specific web application case:
public class BaseViewModel
{
    protected void RaiseAndSetProperty<T>(ref T field, T value, [CallerMemberName] string property = "")
    {
        if (!field.Equals(value))
        {
            field = value;

            // At this point we need to do something special - since we are not in the XAML world
            string json;

            if (typeof(T).IsValueType)
            {
                json = new JObject() { new JProperty(property, value) }.ToString();
            }
            else
            {
                json = JObject.FromObject(new { Node = value }).ToString();
            }

            // A simple websocket session manager that allows communication back to the client
            SessionManager.Current.SendToClient(json);
        }
    }
}
Okay the trick here is the JSON serialization and send back to the client via the Websocket. Quite simple really. We are also using the .NET 4.5 new CallerMemberName feature which automatically populates a parameter with the name of the member name that’s calling this method - very useful in this case. So we are almost there. But we have one more missing piece on the server side. Recall in our last discussion we talked about a DataContext. The View creates the ViewModel and sets it as part of the DataContext. But in this case the view is a HTML - how can it create an instance of the ViewModel - which is on the server side? So we need to provide a really simple mechanism for this, and that’s done via-exposing a MVC 4 Web API - REST endpoint:
public class AttachController : ApiController
{
    public bool Get(string id)
    {
        Activator.CreateInstance(Type.GetType(id));
        return true;
    }
}
That’s it - all we are doing here is exposing a /attach/ API - where you can pass in the name of the ViewModel and it will use reflection to create an instance of that type for you on the server side. That’s all. When the instance is created the rest of the communication happens through WebSockets like we saw earlier. We are very close to unwrapping this gift and this whole thing working end-to-end, but for that we will need the UI - which is a simple HTML page. We will discuss this in part III of our discussion.
- Using the MVVM pattern on web applications – Part I
- Using the MVVM pattern on web applications – Part II
- Using the MVVM pattern on web applications – Part III
Comments
Came here from LinkedIn or X? Join the conversation below — all discussion lives here.